PCD8544 屏幕显示树莓派运行状态

pcd8544-on-rpi

准备好

  • 一个正常运行的 Pi
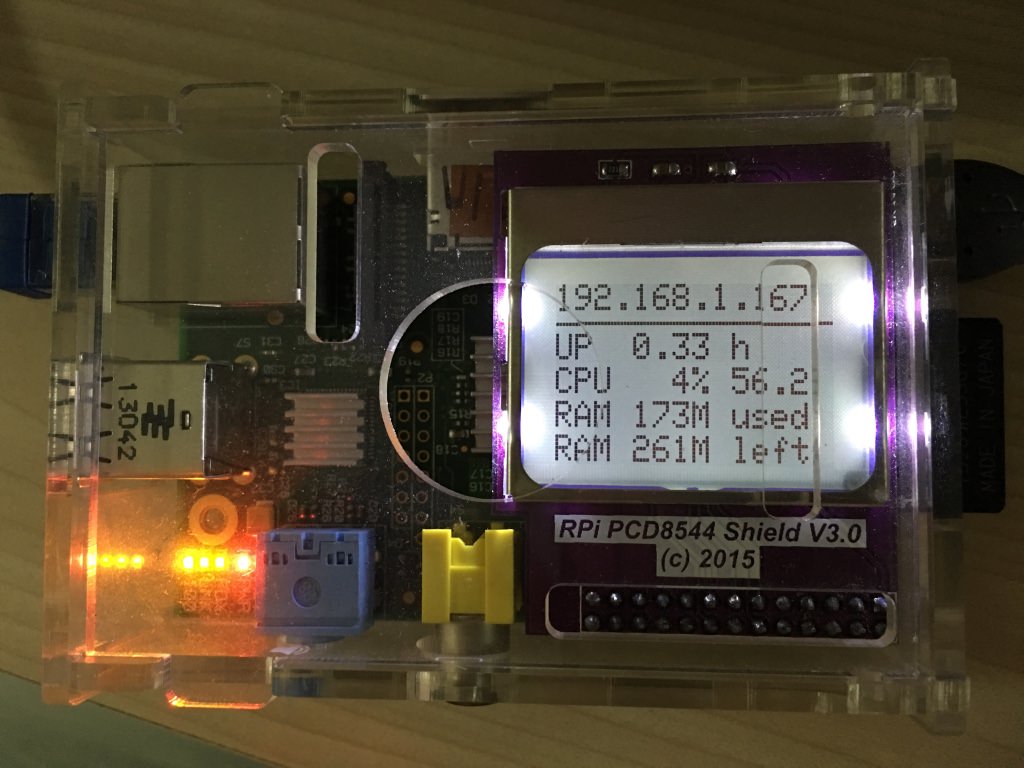
  • 适配 Pi 的 PCD8544 屏幕(之前从马云家买的,现已下架)

需要显示

  • IP,没分到或拔掉网线时显示Link Down
  • 系统 uptime
  • CPU 的使用率和温度
  • 内存的使用情况
  • 每隔 4 秒刷新一次

安装 WiringPi

根据官网的描述,

WiringPi is a GPIO access library written in C for the BCM2835 used in the Raspberry Pi.

简单理解,WiringPi 是一个用 C 写的控制 GPIO 的库。

$ git clone git://git.drogon.net/wiringPi
$ cd wiringPi
$ ./build

装完测试一下,可以看到类似下面的输出。

pi@raspberrypi:~ $ gpio readall
+-----+-----+---------+------+---+-Model B2-+---+------+---------+-----+-----+
| BCM | wPi | Name | Mode | V | Physical | V | Mode | Name | wPi | BCM |
+-----+-----+---------+------+---+----++----+---+------+---------+-----+-----+
| | | 3.3v | | | 1 || 2 | | | 5v | | |
| 2 | 8 | SDA.1 | IN | 1 | 3 || 4 | | | 5V | | |
| 3 | 9 | SCL.1 | IN | 1 | 5 || 6 | | | 0v | | |
| 4 | 7 | GPIO. 7 | IN | 1 | 7 || 8 | 1 | ALT0 | TxD | 15 | 14 |
| | | 0v | | | 9 || 10 | 1 | ALT0 | RxD | 16 | 15 |
| 17 | 0 | GPIO. 0 | OUT | 0 | 11 || 12 | 0 | OUT | GPIO. 1 | 1 | 18 |
| 27 | 2 | GPIO. 2 | OUT | 0 | 13 || 14 | | | 0v | | |
| 22 | 3 | GPIO. 3 | OUT | 0 | 15 || 16 | 1 | OUT | GPIO. 4 | 4 | 23 |
| | | 3.3v | | | 17 || 18 | 0 | IN | GPIO. 5 | 5 | 24 |
| 10 | 12 | MOSI | IN | 0 | 19 || 20 | | | 0v | | |
| 9 | 13 | MISO | IN | 0 | 21 || 22 | 0 | IN | GPIO. 6 | 6 | 25 |
| 11 | 14 | SCLK | IN | 0 | 23 || 24 | 1 | IN | CE0 | 10 | 8 |
| | | 0v | | | 25 || 26 | 1 | IN | CE1 | 11 | 7 |
+-----+-----+---------+------+---+----++----+---+------+---------+-----+-----+
| 28 | 17 | GPIO.17 | IN | 0 | 51 || 52 | 0 | IN | GPIO.18 | 18 | 29 |
| 30 | 19 | GPIO.19 | IN | 0 | 53 || 54 | 0 | IN | GPIO.20 | 20 | 31 |
+-----+-----+---------+------+---+----++----+---+------+---------+-----+-----+
| BCM | wPi | Name | Mode | V | Physical | V | Mode | Name | wPi | BCM |
+-----+-----+---------+------+---+-Model B2-+---+------+---------+-----+-----+
pi@raspberrypi:~ $

找个例子

搜到这篇文章,贴出重要部分的截图。

pcd8544-blog-summary

模仿作者 GitHub 仓库中的三个例子,最终撸出的代码如下,其中,

// monitor8544.c

#include <wiringPi.h>
#include <stdio.h>
#include <stdlib.h>
#include <string.h>
#include <sys/sysinfo.h>
#include "PCD8544.h"
#include <sys/types.h>
#include <ifaddrs.h>
#include <netinet/in.h>
#include <arpa/inet.h>

// interface name
#define ETH_NAME "eth0"
// cpu temperature file path
#define CPU_TEMPERATURE_FILE_PATH "/sys/class/thermal/thermal_zone0/temp"

// pin setup
const int SCLK = 0;
const int DIN = 1;
const int DC = 2;
int RST = 4;
int CS = 3;
// lcd contrast
const int LCD_CONTRAST = 50;
// screen refresh cycle time in milliseconds
const int SCREEN_REFRESH_CYCLE = 4000;
// string length
const int MAX_STRING_LENGTH = 40;

double cpuTemperature() {
FILE *file;
double t;
file = fopen(CPU_TEMPERATURE_FILE_PATH, "r");
if (file == NULL) {
fprintf(stderr, "Open file thermal_zone0/temp ERROR\n");
return -1;
}
fscanf(file, "%lf", &t);
fclose (file);
return t / 1000;
}

void getIPv4Address(char (*address)[MAX_STRING_LENGTH]) {
struct ifaddrs *ifAddrStruct = NULL, *ifa = NULL;
void *tmpAddrPtr = NULL;
strcpy(*address, "Link Down");
getifaddrs(&ifAddrStruct);

for (ifa = ifAddrStruct; ifa != NULL; ifa = ifa->ifa_next) {
if (!ifa->ifa_addr) {
continue;
}
if (ifa->ifa_addr->sa_family == AF_INET && !strcmp(ifa->ifa_name, ETH_NAME)) {
tmpAddrPtr = &((struct sockaddr_in *)ifa->ifa_addr)->sin_addr;
inet_ntop(AF_INET, tmpAddrPtr, *address, INET_ADDRSTRLEN);
}
}
if (ifAddrStruct != NULL) {
freeifaddrs(ifAddrStruct);
}
}

int main() {
if (wiringPiSetup() == -1) { // check wiringPi setup
fprintf(stderr, "wiringPi Setup ERROR\n");
exit(1);
}
LCDInit(SCLK, DIN, DC, CS, RST, LCD_CONTRAST);

LCDclear();
LCDshowLogo(); // show logo one time
delay(SCREEN_REFRESH_CYCLE);

while (1) {
LCDclear();
// network interface
char network[MAX_STRING_LENGTH];
getIPv4Address(&network);
// system usage
struct sysinfo sys_info;
if (sysinfo(&sys_info) != 0) {
fprintf(stderr, "Read sysinfo ERROR\n");
return 2;
}
// uptime
char uptimeInfo[MAX_STRING_LENGTH];
sprintf(uptimeInfo, "UP %.2lf h", 1.0 * sys_info.uptime / 3600);
// cpu load and temperature
char cpuInfo[MAX_STRING_LENGTH];
sprintf(cpuInfo, "CPU %3ld%% %.1lf", sys_info.loads[0] / 1000, cpuTemperature());
// ram usage
char ramUsed[MAX_STRING_LENGTH];
sprintf(ramUsed, "RAM %03ldM used", (sys_info.totalram - sys_info.freeram) / 1024 / 1024);
char ramLeft[MAX_STRING_LENGTH];
sprintf(ramLeft, "RAM %03ldM left", sys_info.freeram / 1024 / 1024);

// build screen
LCDdrawstring(0, 0, network);
LCDdrawline(0, 10, 83, 10, BLACK);
LCDdrawstring(0, 13, uptimeInfo);
LCDdrawstring(0, 22, cpuInfo);
LCDdrawstring(0, 31, ramUsed);
LCDdrawstring(0, 40, ramLeft);
LCDdisplay();
delay(SCREEN_REFRESH_CYCLE);
}
return 0;
}

添加开机启动

直接在/etc/rc.local里加一句话:

sudo /full/path/to/your/executable/file &

不要少了最后的&,否则 Pi 无法启动

If your command runs continuously (perhaps runs an infinite loop) or is likely not to exit, you must be sure to fork the process by adding an ampersand to the end of the command, like so:
python /home/pi/myscript.py &
Otherwise, the script will not end and the Pi will not boot. The ampersand allows the command to run in a separate process and continue booting with the process running.